個別ページ(single-cast.php)を用意。
メンバーの個別プロフィールを表示させる「個別ページ」を用意します。
投稿タイプが「cast」なので、single-cast.phpというファイルを作ると、このファイルが表示用に使われます。
通常のループを回して、ループ内にカスタムフィールドの内容を表示させていきます。
<?php if ( have_posts() ): while ( have_posts() ): the_post(); ?>
<article id="profile">
<h2><?php the_title(); ?></h2>
<div class="en"><?php the_field('en_neme'); ?></div>
<!-- 左カラム 写真部分 fancybox使用 -->
<div class="left-column">
<?php
$image = get_field('image');
if( !empty($image) ):
	// vars
	$url = $image['url'];
	$title = $image['title'];
	$alt = $image['alt'];
	// thumbnail
	$size = 'medium';
	$thumb = $image['sizes'][ $size ];
?>
<a href="<?php echo $url; ?>" title="<?php echo $title; ?>" class="fancybox">
<img src="<?php echo $thumb; ?>" alt="<?php echo $alt; ?>" />
</a>
<?php endif; ?>
<?php the_content(); ?>
</div>
<!-- 右カラム プロフィール部分 -->
<div class="right-column">
<dl class="profile">
<dt>生年月日</dt>
<dd><?php the_field('birthday'); ?></dd>
<dt>出身地</dt>
<dd><?php the_field('area'); ?></dd>
<dt>サイズ</dt>
<dd><?php the_field('bodysize'); ?></dd>
<dt>経歴</dt>
<dd><?php the_field('career'); ?></dd>
</dl>
</div>
</article>
<?php endwhile; endif; ?>
左カラムの写真はfancyboxを使って拡大表示させるためコードが少し複雑です。
右カラムのプロフィール欄は(スマホでの閲覧を考慮して)「table」ではなく「Definition List」を使います。
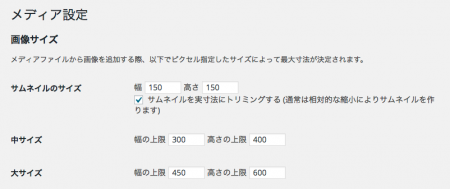
写真は中サイズを表示させるので、設定→メディアで「中サイズ」を幅の上限「300」高さの上限「400」にしておきます。
![]()
![]()